Back when Etherkit did come out with its Si5351 boards, I wrote some sketches to use these as VFO’s. These sketches have been floating around the internet, without being collected at a single place, so thats going to change, in hope that it will reduce the repeating e-mails a bit.
Both sketches work as a basic VFO. It starts at a given frequency, and there is not implemented a method of changing bands. This can be easily added by someone with a little programming experience. All of these sketches requires NT7S Si5351 library. Please support his development by buying a board.
The encoder used is a regular quadrature encoder (not Graycode, altough using a stepper motor as a graycode encoder should be investigated). There needs to be a couple debouncing capacitors (100nF) over each of the leads from encoder to ground. This should go as close to the encoder as possible. In addition, you may want to add a 22Ω resistor in series with the A and B leads, and another 100nF at the microcontroller side.
There is a RX/TX pin. Put this pin LOW for RX or the VFO will not tune. This is a tune inhibit function, and can be used for locking the tuning while TX.
The sketches are made to work on both AtMega328 and AtMega32U4 boards. There is some preprosessor switches to decide between those 2. If you use a different board, you may need to use a different set of interrupt pins, and some other preprosessor switches.
All of these sketches are provided free of charge, as is, for use by experimenters in non-comercial ways. There is no warranty nor support, altough I may answer some questions…
There exists 2 kinds of versions of the sketch depending on what display you want to use:
16×2 LCD Display
This is the most common one.

This file contains hidden or bidirectional Unicode text that may be interpreted or compiled differently than what appears below. To review, open the file in an editor that reveals hidden Unicode characters.
Learn more about bidirectional Unicode characters
| /* | |
| Si5351 VFO | |
| By LA3PNA 27 March 2015 | |
| Modified 14 February 2017 | |
| Modified 28 November 2018 | |
| This code is licenced with GNU GPL v2. Please read: https://www.gnu.org/licenses/old-licenses/gpl-2.0.html | |
| This version uses the new version (v2) of the Si5351 library from NT7S. | |
| see: http://arduino.cc/en/Reference/AttachInterrupt for what pins that have interrupts. | |
| UNO and 328 boards: Encoder on pin 2 and 3. Center pin to GND. | |
| Leonardo: Encoder on pin 0 and 1. Center pin to GND. | |
| 100nF from each of the encoder pins to gnd is used to debounce | |
| The pushbutton goes to pin 4 to set the tuning rate. | |
| Pin 5 is the RX/TX pin. Put this pin LOW for RX, open or high for TX. | |
| Single transistor switch to +RX will work. | |
| VFO will NOT tune in TX. | |
| LCD connections: | |
| * LCD RS pin to digital pin 12 | |
| * LCD Enable pin to digital pin 11 | |
| * LCD D4 pin to digital pin 10 | |
| * LCD D5 pin to digital pin 9 | |
| * LCD D6 pin to digital pin 8 | |
| * LCD D7 pin to digital pin 7 | |
| * LCD R/W pin to ground | |
| * LCD VSS pin to ground | |
| * LCD VCC pin to 5V | |
| * 10K pot: | |
| * ends to +5V and ground | |
| * wiper to LCD VO pin (pin 3) | |
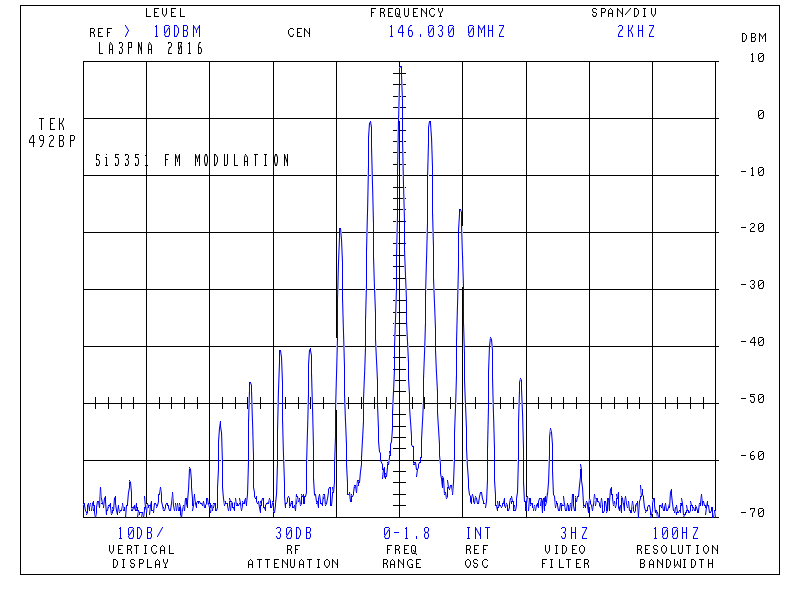
| IF frequency is positive for sum product (IF = RF + LO) and negative for diff (IF = RF – LO) | |
| VFO signal output on CLK0, BFO signal on CLK2 | |
| ToDo: | |
| * | |
| */ | |
| volatile uint64_t frequency = 7100000; // This will be the frequency it always starts on. | |
| long iffreq = 0; // set the IF frequency in Hz. | |
| long freqstep[] = {50, 100, 500, 1000, 5000, 10000}; // set this to your wanted tuning rate in Hz. | |
| int corr = 10; // this is the correction factor for the Si5351, use calibration sketch to find value. | |
| unsigned int lastReportedPos = 1; // change management | |
| static boolean rotating = false; // debounce management | |
| #include <si5351.h> | |
| #include "Wire.h" | |
| #include <LiquidCrystal.h> | |
| Si5351 si5351; | |
| // interrupt service routine vars | |
| boolean A_set = false; | |
| boolean B_set = false; | |
| LiquidCrystal lcd(12, 11, 10, 9, 8, 7); | |
| #if defined(__AVR_ATmega32U4__) || defined(__AVR_ATmega16U4__) | |
| int encoderPinA = 0; // rigth | |
| int encoderPinB = 1; // left | |
| #endif | |
| #if defined(__AVR_ATmega328P__) || defined(__AVR_ATmega168__) | |
| int encoderPinA = 2; // rigth | |
| int encoderPinB = 3; // left | |
| #endif | |
| int inData; | |
| bool tx; | |
| int txpin = 5; | |
| int freqsteps = 1; | |
| int stepbutton = 4; | |
| #define arraylength (sizeof(freqstep) / sizeof(freqstep[0])) | |
| void setup() { | |
| pinMode(encoderPinA, INPUT); | |
| pinMode(encoderPinB, INPUT); | |
| //pinMode(clearButton, INPUT); | |
| pinMode(stepbutton, INPUT); | |
| pinMode(txpin, INPUT); | |
| digitalWrite(txpin, HIGH); | |
| // turn on pullup resistors | |
| digitalWrite(encoderPinA, HIGH); | |
| digitalWrite(encoderPinB, HIGH); | |
| digitalWrite(stepbutton, HIGH); | |
| #if defined(__AVR_ATmega32U4__) || defined(__AVR_ATmega16U4__) | |
| //Code in here will only be compiled if an Arduino Leonardo is used. | |
| // encoder pin on interrupt 0 (pin 0) | |
| attachInterrupt(1, doEncoderA, CHANGE); | |
| // encoder pin on interrupt 1 (pin 1) | |
| attachInterrupt(0, doEncoderB, CHANGE); | |
| #endif | |
| #if defined(__AVR_ATmega328P__) || defined(__AVR_ATmega168__) | |
| //Code in here will only be compiled if an Arduino Uno (or older) is used. | |
| attachInterrupt(0, doEncoderA, CHANGE); | |
| // encoder pin on interrupt 1 (pin 1) | |
| attachInterrupt(1, doEncoderB, CHANGE); | |
| #endif | |
| si5351.init(SI5351_CRYSTAL_LOAD_8PF, 0, corr); | |
| lcd.begin(16, 2); | |
| lcd.print("Si5351 VFO"); | |
| Serial.begin(9600); | |
| delay(2000); | |
| si5351.set_freq(iffreq * 100ULL, SI5351_CLK2); | |
| } | |
| // main loop, work is done by interrupt service routines, this one only prints stuff | |
| void loop() { | |
| tx = digitalRead(txpin); | |
| rotating = true; // reset the debouncer | |
| if ( lastReportedPos != frequency) { | |
| lastReportedPos = frequency; | |
| lcd.setCursor(0, 1); | |
| lcd.print(" "); | |
| lcd.print((long)frequency); | |
| si5351.set_freq((frequency + iffreq) * 100ULL, SI5351_CLK0); | |
| } | |
| delay(50); | |
| if (Serial.available() > 0) // see if incoming serial data: | |
| { | |
| inData = Serial.read(); // read oldest byte in serial buffer: | |
| } | |
| if (inData == 'F') { | |
| frequency = Serial.parseInt(); | |
| inData = 0; | |
| } | |
| if (digitalRead(stepbutton) == LOW ) { | |
| delay(150); // delay to debounce | |
| if (digitalRead(stepbutton) == LOW ) { | |
| freqsteps = freqsteps + 1; | |
| Serial.print(freqstep[freqsteps – 1]); | |
| Serial.print(" "); | |
| Serial.print(freqsteps); | |
| Serial.print(" "); | |
| Serial.println(sizeof(freqstep)); | |
| if (freqsteps > arraylength – 1 ) { | |
| freqsteps = 0; | |
| } | |
| delay(1000); //delay to avoid many steps at one | |
| } | |
| } | |
| } | |
| // Interrupt on A changing state | |
| void doEncoderA() { | |
| // debounce | |
| if ( rotating ) delay (1); // wait a little until the bouncing is done | |
| // Test transition, did things really change? | |
| if ( digitalRead(encoderPinA) != A_set ) { // debounce once more | |
| A_set = !A_set; | |
| // adjust counter + if A leads B | |
| if ( A_set && !B_set ) { | |
| if (!tx) { | |
| frequency += freqstep[freqsteps]; // hehre is the amount to increase the freq | |
| } | |
| rotating = false; // no more debouncing until loop() hits again | |
| } | |
| } | |
| } | |
| // Interrupt on B changing state, same as A above | |
| void doEncoderB() { | |
| if ( rotating ) delay (1); | |
| if ( digitalRead(encoderPinB) != B_set ) { | |
| B_set = !B_set; | |
| // adjust counter – 1 if B leads A | |
| if ( B_set && !A_set ) { | |
| if (!tx) { | |
| frequency -= freqstep[freqsteps]; // here is the amount to decrease the freq | |
| } | |
| rotating = false; | |
| } | |
| } | |
| } |
If you want to use this with I2C 1602 modules:
There is currently no way of using it directly on the Si5351 sketches I have written. I would assume that the modifications to the regular LCD display sketch would not be too hard to do.
Looking at this page:
https://www.sunfounder.com/learn/sensor-kit-v2-0-for-arduino/lesson-1-display-by-i2c-lcd1602-sensor-kit-v2-0-for-arduino.html
Down load the LCD library shown there, you should then be able to
replace the line 58 #include <LiquidCrystal.h> with #include
<LiquidCrystal_I2C.h> and line 64 LiquidCrystal lcd(12, 11, 10, 9, 8,
7); with LiquidCrystal_I2C lcd(0x27,16,2);
I have not tried it, but it should be one way of using those 16×2 I2C displays.
OLED display
There is some nice, small OLEDS around for $3 or so that can be used with a graphics library called U8glib: https://github.com/olikraus/u8glib

This file contains hidden or bidirectional Unicode text that may be interpreted or compiled differently than what appears below. To review, open the file in an editor that reveals hidden Unicode characters.
Learn more about bidirectional Unicode characters
| /* | |
| VFO program for Si5351 | |
| Using I2C LCD from: | |
| http://www.amazon.com/Huhushop-TM-Serial-Display-Arduino/dp/B00JM88A94/ | |
| Si5351 library from NT7S. | |
| Uses the updated version of the library (master). | |
| Updated with the format_freq routine from Tom AK2B | |
| This code is licenced with GNU GPL v2. Please read: https://www.gnu.org/licenses/old-licenses/gpl-2.0.html | |
| Display library is avaible from: | |
| https://code.google.com/p/u8glib/ | |
| UNO and 328 boards: Encoder on pin 2 and 3. Center pin to GND. | |
| Leonardo: Encoder on pin 0 and 1. Center pin to GND. | |
| 100nF from each of the encoder pins to gnd is used to debounce | |
| The pushbutton goes to pin 6 to set the tuning rate. | |
| Pin 7 is the RX/TX pin. Put this pin LOW for RX, open or high for TX. | |
| Single transistor switch to +RX will work. | |
| VFO will NOT tune in TX. | |
| In serial monitor, you can send "F"+frequency to set frequency. Ex: "F7063000" | |
| IF frequency is positive for sum product (IF = RF + LO) and negative for diff (IF = RF – LO) | |
| VFO signal output on CLK0, BFO signal on CLK2 | |
| TODO: | |
| * Write own OLED i2c library with optimizing for text to reduce size of compiled program. | |
| *Add variable tuning resolution | |
| */ | |
| volatile unsigned long frequency = 144400000; // This will be the frequency it always starts on. | |
| long freqstep[] = {50, 100, 500, 1000, 5000, 10000}; // set this to your wanted tuning rate in Hz. | |
| int corr = 120; // this is the correction factor for the Si5351, use calibration sketch to find value. | |
| long iffreq = 0; // set the IF frequency in Hz. | |
| #include "U8glib.h" | |
| U8GLIB_SSD1306_128X32 u8g(U8G_I2C_OPT_NONE); // I2C / TWI | |
| String str; | |
| char b[8]; | |
| int inData; | |
| String displayFreq; | |
| boolean A_set = false; | |
| boolean B_set = false; | |
| unsigned int lastReportedPos = 1; // change management | |
| static boolean rotating = false; // debounce management | |
| #include <si5351.h> | |
| #include "Wire.h" | |
| Si5351 si5351; | |
| // int encoderPinA ; | |
| //int encoderPinB; | |
| #if defined(__AVR_ATmega32U4__) || defined(__AVR_ATmega16U4__) | |
| int encoderPinA = 0; | |
| int encoderPinB = 1; | |
| #endif | |
| #if defined(__AVR_ATmega328P__) || defined(__AVR_ATmega168__) | |
| int encoderPinA = 2; | |
| int encoderPinB = 3; | |
| #endif | |
| bool tx; | |
| int txpin = 7; | |
| int freqsteps = 1; | |
| int bandbutton = 6; | |
| #define arraylength (sizeof(freqstep) / sizeof(freqstep[0])) | |
| void setup() | |
| { | |
| // set the encoder to inputs | |
| pinMode(encoderPinA, INPUT); | |
| pinMode(encoderPinB, INPUT); | |
| pinMode(txpin, INPUT); | |
| pinMode(bandbutton, INPUT); | |
| // turn on pullup resistors | |
| digitalWrite(encoderPinA, HIGH); | |
| digitalWrite(encoderPinB, HIGH); | |
| digitalWrite(txpin, HIGH); | |
| digitalWrite(bandbutton, HIGH ); | |
| u8g.setFont(u8g_font_courB12); | |
| Serial.begin(9600); | |
| // Initialize the Si5351 | |
| // Change the 2nd parameter in init if using a ref osc other | |
| // than 25 MHz | |
| si5351.init(SI5351_CRYSTAL_LOAD_8PF, 0, corr); | |
| si5351.drive_strength(SI5351_CLK0, SI5351_DRIVE_4MA); | |
| si5351.drive_strength(SI5351_CLK2, SI5351_DRIVE_4MA); | |
| // assign default color value | |
| if ( u8g.getMode() == U8G_MODE_R3G3B2 ) { | |
| u8g.setColorIndex(255); // white | |
| } | |
| else if ( u8g.getMode() == U8G_MODE_GRAY2BIT ) { | |
| u8g.setColorIndex(3); // max intensity | |
| } | |
| else if ( u8g.getMode() == U8G_MODE_BW ) { | |
| u8g.setColorIndex(1); // pixel on | |
| } | |
| else if ( u8g.getMode() == U8G_MODE_HICOLOR ) { | |
| u8g.setHiColorByRGB(255, 255, 255); | |
| } | |
| #if defined(__AVR_ATmega32U4__) || defined(__AVR_ATmega16U4__) | |
| encoderPinA = 0; | |
| encoderPinB = 1; | |
| //Code in here will only be compiled if an Arduino Leonardo is used. | |
| // encoder pin on interrupt 2 (pin 0) | |
| attachInterrupt(2, doEncoderA, CHANGE); | |
| // encoder pin on interrupt 3 (pin 1) | |
| attachInterrupt(3, doEncoderB, CHANGE); | |
| #endif | |
| #if defined(__AVR_ATmega328P__) || defined(__AVR_ATmega168__) | |
| encoderPinA = 2; | |
| encoderPinB = 3; | |
| //Code in here will only be compiled if an Arduino Uno (or older) is used. | |
| attachInterrupt(0, doEncoderA, CHANGE); | |
| // encoder pin on interrupt 1 (pin 1) | |
| attachInterrupt(1, doEncoderB, CHANGE); | |
| #endif | |
| si5351.set_freq((iffreq) * 100ULL, SI5351_CLK2); | |
| } | |
| void loop() | |
| { | |
| tx = digitalRead(txpin); | |
| rotating = true; // reset the debouncer | |
| if ( lastReportedPos != frequency) { | |
| lastReportedPos = frequency; | |
| // Serial.print(frequency); // unncomment this to output frequency on change. | |
| si5351.set_freq((frequency + iffreq) * 100ULL, SI5351_CLK0); | |
| } | |
| if (digitalRead(bandbutton) == LOW ) { | |
| delay(150); // delay to debounce | |
| if (digitalRead(bandbutton) == LOW ) { | |
| freqsteps = freqsteps + 1; | |
| Serial.print(freqstep[freqsteps – 1]); | |
| Serial.print(" "); | |
| Serial.print(freqsteps); | |
| Serial.print(" "); | |
| Serial.println(sizeof(freqstep)); | |
| if (freqsteps > arraylength – 1 ) { | |
| freqsteps = 0; | |
| } | |
| delay(1000); //delay to avoid many steps at one | |
| } | |
| } | |
| format_freq(); | |
| // rebuild the picture after some delay | |
| delay(50); | |
| if (Serial.available() > 0) // see if incoming serial data: | |
| { | |
| inData = Serial.read(); // read oldest byte in serial buffer: | |
| } | |
| if (inData == 'F') { | |
| frequency = Serial.parseInt(); | |
| inData = 0; | |
| } | |
| } | |
| // Interrupt on A changing state | |
| void doEncoderA() { | |
| // debounce | |
| if ( rotating ) delay (1); // wait a little until the bouncing is done | |
| // Test transition, did things really change? | |
| if ( digitalRead(encoderPinA) != A_set ) { // debounce once more | |
| A_set = !A_set; | |
| // adjust counter + if A leads B | |
| if ( A_set && !B_set ) { | |
| if (!tx) { | |
| frequency += freqstep[freqsteps]; // hehre is the amount to increase the freq | |
| } | |
| rotating = false; // no more debouncing until loop() hits again | |
| } | |
| } | |
| } | |
| // Interrupt on B changing state, same as A above | |
| void doEncoderB() { | |
| if ( rotating ) delay (1); | |
| if ( digitalRead(encoderPinB) != B_set ) { | |
| B_set = !B_set; | |
| // adjust counter – 1 if B leads A | |
| if ( B_set && !A_set ) { | |
| if (!tx) { | |
| frequency -= freqstep[freqsteps]; // here is the amount to decrease the freq | |
| } | |
| rotating = false; | |
| } | |
| } | |
| } | |
| void format_freq() { | |
| u8g.firstPage(); | |
| do { | |
| u8g.setPrintPos(0,15); | |
| uint16_t f, g; | |
| f = frequency / 1000000; | |
| if (f < 10) | |
| u8g.print(' '); | |
| u8g.print(f); | |
| u8g.print('.'); | |
| f = (frequency % 1000000) / 1000; | |
| if (f < 100) | |
| u8g.print('0'); | |
| if (f < 10) | |
| u8g.print('0'); | |
| u8g.print(f); | |
| u8g.print('.'); | |
| f = frequency % 1000; | |
| if (f < 100) | |
| u8g.print('0'); | |
| if (f < 10) | |
| u8g.print('0'); | |
| u8g.print(f); | |
| u8g.setPrintPos(80,32); | |
| u8g.println(freqstep[freqsteps]); | |
| if (tx) | |
| { | |
| u8g.drawStr( 110, 15, "TX" ); | |
| } | |
| //draw(); | |
| } while ( u8g.nextPage() ); | |
| } |
This version supports both Arduino Uno with ATMega 328, and Arduino Leonardo with ATMega 32U4.
If you do use this code, please send me a mention, either in the comment or on twitter so other can see what you are doing.